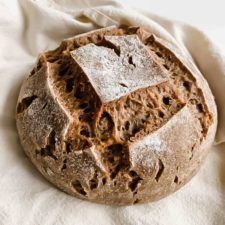
Description
This rustic grain-free, AIP sourdough bread is made with a blend of grain-free flours and white sweet potato mash. *This recipe was updated on May 22, 2020.
Ingredients
- 3/4 cup filtered water
- 2 TBSP avocado or olive oil
- 1 TBSP honey (use maple syrup if vegan)
- 1/4 cup well-fed, active grain-free sourdough starter
- 1/4 cup + 2 tbsp white sweet potato mash
- 1 TBSP apple cider vinegar
- 1/4 cup cassava flour
- 1/2 cup tapioca starch
- 1/4 cup green banana flour
- 1 1/2 cups tigernut flour
- 1 3/4 tsps salt
Instructions
- In a large bowl, add filtered water, oil, honey, well-fed sourdough starter, white sweet potato mash and apple cider vinegar. Stir until combined.
- In a separate bowl, sift together cassava flour, tapioca starch, green banana flour, tigernut flour and salt.
- Add dry ingredients to wet ingredients, stirring well to ensure all flour is incorporated into a shaggy dough. Dough should be tacky but not wet and shouldn’t impart on your fingers too much – add more tigernut flour by the TBSP until this consistency is achieved.
- Cover with kitchen towel and set aside for 1.5-2 hours.
- Dust a towel-lined bowl with cassava flour.
- After 1.5-2 hours, dough should feel quite spongy and moist. Be gentle with it and try not to over-manipulate/deflate as you shape into a round/boule about 5 – 5.5 inches in diameter. Dipping your hands in water if necessary, smooth out the surface of the bread.
- Place the shaped and smoothed dough into the towel-lined and floured bowl and cover with towel/plastic wrap.
- Place the covered dough in the refrigerator for 8 hours (or overnight up to 12 hours). It should rise about 1/2 – 3/4 inch. After this time, take dough out the fridge and allow time for it to warm a bit before the next step.*
- 45 minutes before baking, place an empty Dutch oven into the oven and preheat to 450 degrees F.
- While oven preheats, cut a piece a parchment paper slightly larger than your dough and transfer dough to paper.
- Lightly dust the dough once more with flour and score the top using a lame, scissors or a sharp knife.**
- Remove dutch oven from the oven and carefully lower your dough into the very hot dutch oven. Cover and place in oven.***
- Bake covered for 30 minutes.
- At the 30 minute mark, remove lid and bake for another 30-35 minutes or until internal temperature is 195°F.
- Resist the temptation to cut into the bread and allow to cool fully for 2 hrs before slicing.
Notes
* You might notice that your dough has cracked/split open a bit during the proofing process due to the moisture and lack of gluten that forms that smooth elastic surface on dough and keeps the bubbles inside. If this happens, simply wet your hands again and gently smooth the dough in an attempt to reduce further cracking while baking. Scoring your bread also helps direct the flow of air and expansion and so helps prevent further cracks.
**For more on scoring see this tutorial.
*** I like to place a baking sheet on the rack below my dutch oven once I place the bread in. This prevents the bottom of the bread from absorbing too much heat and browning too fast. Just before baking, I add a few cubes of ice to the baking sheet to create more steam that helps the bread rise.
- Prep Time: 10 hours
- Cook Time: 60 minutes
- Category: Bread
- Method: Baking